
A price per square metre is a useful starting point, but it doesn’t tell the whole story. The stainless steel splashback cost in the UK depends on factors such as the steel grade, thickness, finish and whether the panel is made to measure.
It is understandable to want a clear figure before planning a kitchen or washroom project. This guide explains what affects the price and how to compare splashback specifications, so you can identify which details matter for your requirements.
We also cover standard and bespoke panels, the practical uses of stainless steel splashbacks and what to consider when planning installation. This gives you a more reliable basis for budgeting than a square-metre figure alone.
Key Takeaways
- Compare splashbacks like for like: steel grade, finish, thickness and backing all influence the specification and the price per square metre.
- Choose thickness with the setting in mind: standard options suit different requirements, while bespoke panels can accommodate non-standard dimensions.
- For adhesive fitting, allow an approximately 1 mm expansion gap around each edge and support the panel while the adhesive cures.
- Custom cooker panels can be made to accommodate cut-outs and shaped edges, so accurate measurements are central to planning the order.
- When assessing total project cost, distinguish the panel price from installation and compare what each quoted price includes, such as VAT and delivery.
What is a stainless steel splashback and its uses?
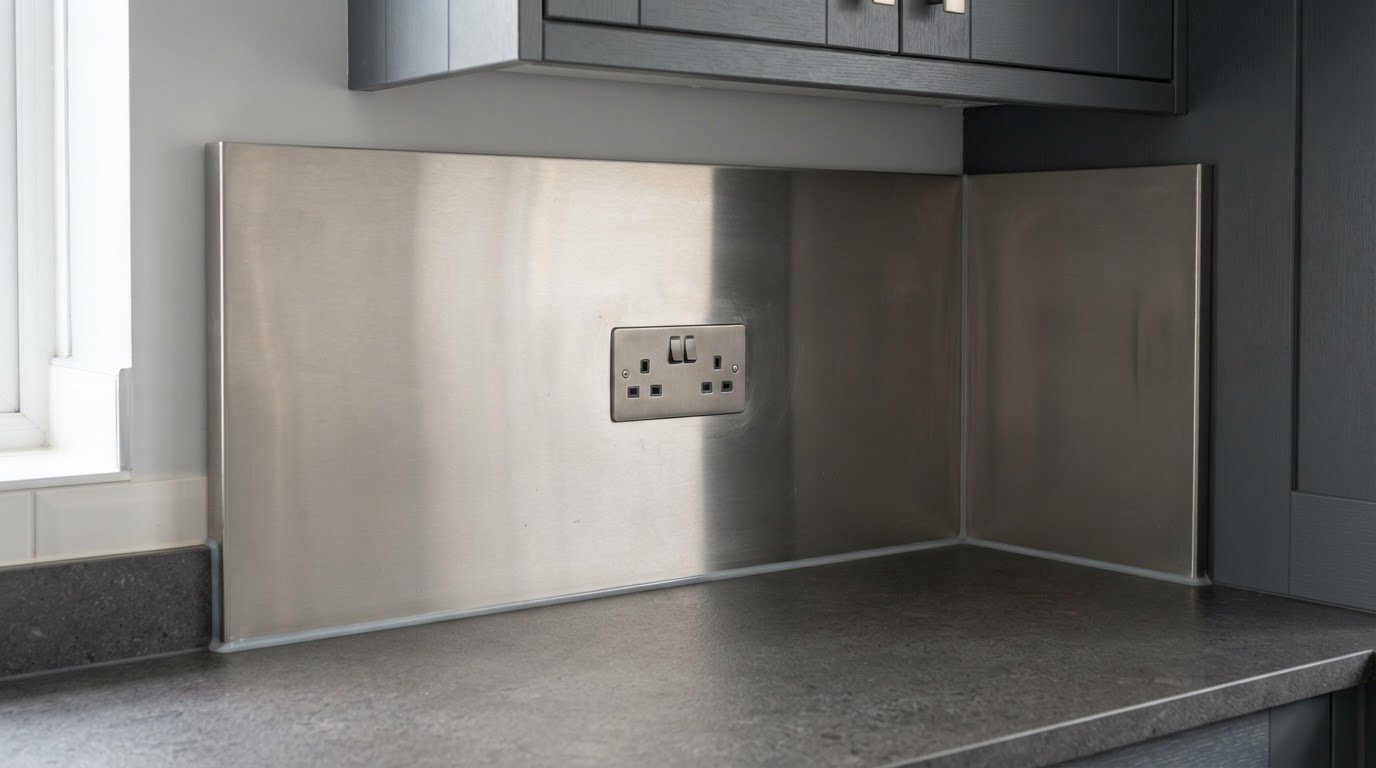
A stainless steel splashback is a protective wall panel fitted behind a hob, sink or work surface. It shields the wall from splashes and cooking residue, while providing a smooth surface that is straightforward to clean. Unlike tiled areas, a sheet panel has no grout lines where grease and moisture can collect. A brushed finish gives the metal a consistent, softly textured appearance.
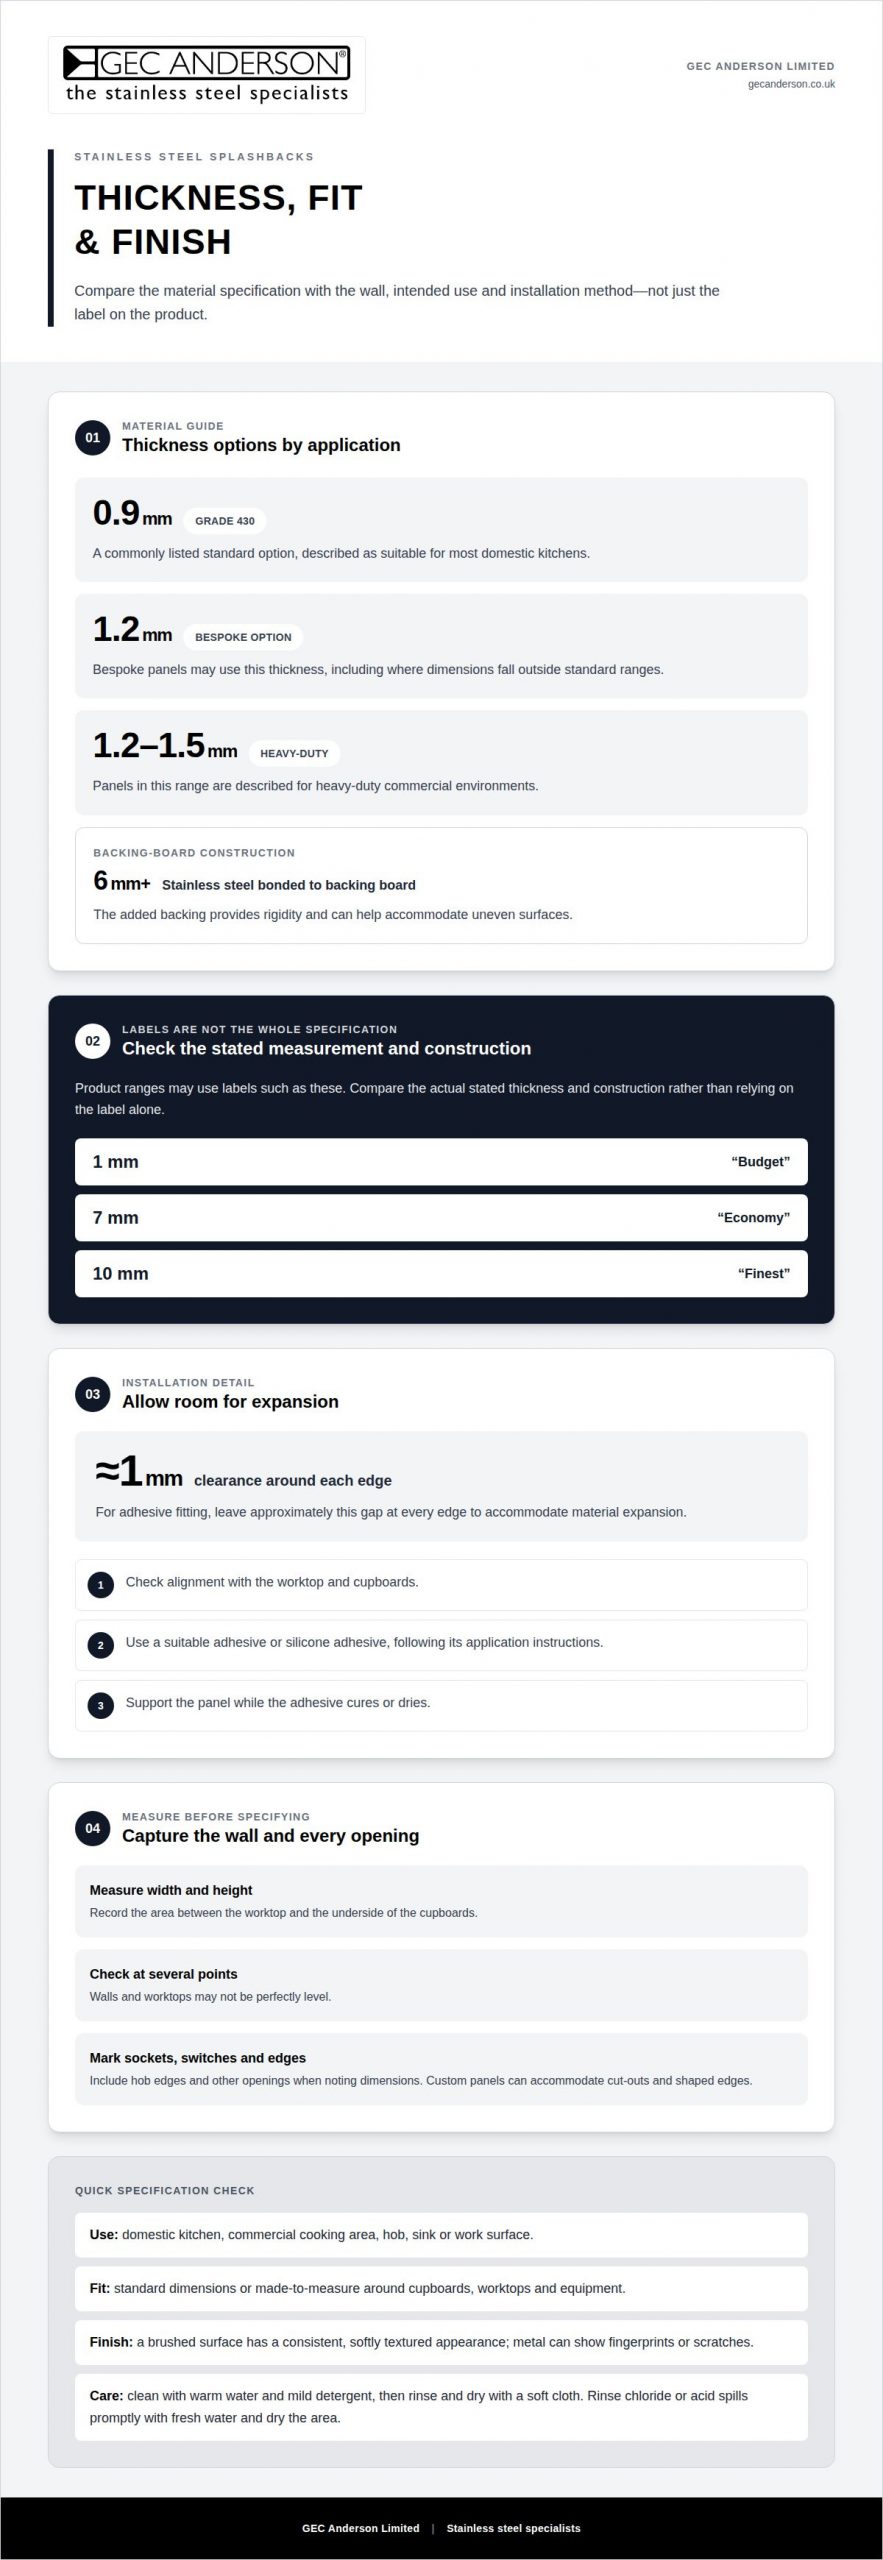
Thickness varies by specification and intended use. A commonly listed standard option is 0.9 mm grade 430 stainless steel, described as suitable for most domestic kitchens. Bespoke panels may use 1.2 mm steel, while panels between 1.2 mm and 1.5 mm are described for heavy-duty commercial environments. Thicker material can provide a more substantial panel, but the wall, dimensions and installation method also affect the appropriate choice.
UK product ranges also use labels such as 1 mm budget, 7 mm economy and 10 mm finest. These are listed thickness options, so compare the stated measurement and construction rather than relying on the label alone. Stainless steel bonded to backing board at 6 mm or thicker is another option; the added backing provides rigidity and can help accommodate uneven surfaces.
Standard sizes suit common wall areas, while bespoke dimensions address gaps around cupboards, worktops and cooking equipment. Custom supply can include thicknesses outside standard ranges. Grade 430 steel is magnetic, and a splashback’s reverse side may be shiny or scratched. The front surface, dimensions and edge details therefore matter more than the appearance of the unseen reverse.
To measure a kitchen wall, record the width and height of the area between the worktop and the underside of the cupboards, checking at several points. Mark sockets, switches, hob edges and other openings on your measurements, as walls and worktops may not be perfectly level.
The main practical advantage is a smooth, wipeable surface without tile grout; the trade-off is that metal can show fingerprints or scratches. Clean it with warm water and mild detergent, then rinse and dry with a soft cloth. Chlorides and acids can damage the finish, so rinse spills promptly with fresh water and dry the area. Routine maintenance uses everyday cleaning materials rather than a specialist treatment, with ongoing spend shaped by the products used.
For a domestic example, a 0.9 mm panel may suit a typical kitchen wall, while a commercial cooking area may call for a heavier specification. A backing board of 6 mm or more can also be considered where extra rigidity or an uneven wall is a concern. The right choice depends on the exposure, desired finish and fit.
Measure the wall and identify how the splashback will be used before deciding on its specification. These details help determine whether a standard panel will fit or a made-to-measure splashback is more suitable.
Installation with adhesive or mechanical fixings
Stainless steel splashbacks can be fixed to a wall or existing tiles with adhesive. Silicone adhesive or a similar product can both secure and seal a standard panel. Adhesive fixing avoids visible screw heads across the finished surface, while mechanical fixings provide discrete attachment points. The wall, panel construction and desired finish influence which approach is suitable.
For adhesive installation, retain the protective plastic coating until fitting is complete. This helps protect the visible face during handling and positioning. Adhesives such as Liquid Nails can be used to attach a panel to a wall or tiles. Optional No Nail adhesive is sent in a separate parcel, so allow for its delivery when planning the installation.
- Position the splashback against the intended wall area and check its alignment with the worktop and cupboards.
- Allow approximately 1 mm around each edge. This clearance accommodates material expansion after fitting.
- Apply a suitable adhesive or silicone adhesive to secure the panel, following the product’s application instructions.
- Support the splashback while the adhesive cures or dries. This prevents the panel separating from the wall during that period.
Mechanical fixings, such as screws, hold a panel at selected points rather than bonding its full rear surface. Their positions affect the visible finish, so plan them around the panel edges and surrounding fixtures. Screw fixing also requires holes through the splashback. Adhesive provides a continuous face, while mechanical attachment may suit a design where visible fixings are acceptable.
Silicone adhesive has a dual role on a standard splashback: it fixes the panel and seals the wall junction. Apply it with care along the intended contact areas, keeping the panel aligned as it is pressed into place. The approximately 1 mm clearance at each edge should remain available for expansion rather than being filled with the panel itself.
Keep the protective coating in place while positioning and fixing the panel, then peel it away after fitting. For example, a splashback can be bonded directly over existing tiles if the surface and adhesive are suitable. Follow the adhesive instructions and support the panel as required while it cures.
Choosing between adhesive and screws is therefore a decision about the wall, panel and intended appearance. Adhesive offers a largely uninterrupted face; screws create defined fixing points. In either case, allow for the 1 mm expansion gap and secure the panel until the adhesive has dried or cured.
Custom cooker splashbacks
A cooker splashback should cover the exposed wall behind the hob and align with nearby cabinets and worktops. A made-to-measure panel can be designed around the kitchen layout, including the required width, height and openings, rather than relying on a standard rectangular size. This can be useful where a cooker sits between units or sockets interrupt the wall area.
Measure the intended panel area carefully, recording the width and height at several points. Note the cooker position, socket locations and any changes in the wall line. These measurements form the basis of the specification. For example, a panel behind a wider cooker may need a different width from one behind a standard hob, while an outlet needs a correctly positioned opening.
Bespoke stainless steel splashbacks larger than 1000mm x 1000mm can be requested. Online splashback calculators can allow customers to specify up to 12 holes, making it possible to plan around multiple sockets or fittings. Enter the dimensions and hole positions precisely: an error in a cut-out can affect the fit and the alignment of the finished panel.
Cut-to-size orders have a tolerance of plus or minus 2mm. That allowance matters where a panel fits between cabinets or beside a worktop, so measurements should account for the surrounding surfaces rather than assume every edge is perfectly straight. A 0,9 mm sheet is one of the standard stainless steel options available in the UK; bespoke work can accommodate dimensions and thicknesses outside standard ranges.
Edge treatment also shapes the finished appearance. A splashback can be supplied with its face and four edges wrapped. Wrapped corners are not welded unless welding is requested, so the corner finish should form part of the specification. This detail can be important where the panel edges remain visible beside cupboards or at the end of a run.
Before requesting a made-to-measure panel, prepare a simple drawing with the overall dimensions and mark each opening from a consistent reference edge. Include the shape and measurements of each cut-out and its distance from the panel edges. A clear drawing helps distinguish, for example, a centred socket from one positioned close to a corner.
Custom sizing is most useful when a cooker area has unusual dimensions, several wall openings or exposed edges requiring a considered finish. A standard panel may suit a straightforward wall, but bespoke cutting addresses the specific geometry of the installation. The essential details are the panel measurements, hole positions, chosen thickness and edge treatment; together, they define how the splashback fits the cooking area.
Price per square metre for stainless steel splashbacks
UK prices provide a starting point, but panel specification and order details affect the final comparison. The market benchmark and listed inclusions help separate material cost from other project expenses.
Typical prices and material comparisons
Brushed stainless steel splashbacks typically cost between £119 and £173 per square metre on the UK market, based on offers collected on 5 November 2026. Treat this as a market range, not a quote for a particular panel or project.
There is no reliable like-for-like comparison with glass, acrylic or tile unless the specifications match. Compare the material, finish, dimensions, cut-outs and included work rather than assuming that the same area means the same specification.
To estimate a panel’s material area, multiply its width by its height, using metres for both measurements. For a cooker panel with sockets, consider the openings and edge treatment alongside the overall area. Square-metre pricing can help compare basic material rates, but a made-to-measure order may have a different total.
Factors affecting splashback cost
Finish, construction and dimensions all affect the specification. For example, compare a flat sheet with stainless steel mounted on waterproof chipboard, and check how the edges are finished. Do not assume that panels with the same area have the same construction.
Dimensions and fabrication also matter. A panel shaped to fit a particular wall or supplied with specified openings needs a clear, detailed drawing. Check whether the quoted price covers the requested construction and edge finish, rather than only the panel itself.
VAT, delivery, cut-outs and installation
UK standard splashback prices shown include VAT and delivery. A bespoke splashback calculator price includes free cutting, which can cover sizing the panel to the requested dimensions.
Do not assume that a product price includes installation. Compare the panel specification and fitting arrangements separately, and include the required edge finish and any openings in your project details.
For a clear comparison, record the panel’s width, height, steel grade, thickness and finish. Then note cut-outs, backing, delivery, VAT and installation separately. This makes it easier to see whether two quoted prices cover equivalent specifications, rather than comparing a basic sheet with a fabricated panel.
When comparing stainless steel splashbacks, look at the stated construction and finish alongside the price. A flat sheet and a panel mounted on waterproof chipboard are different specifications, so their prices should not be treated as interchangeable.
When assessing a quote, note whether it describes flat sheet or MDF-backed steel and record the stated overall thickness. That makes the comparison more useful when checking a project estimate against a listing. The listed rates provide reference points for these particular constructions; they do not by themselves establish what fabrication or fitting is covered in an individual quote.
How much does stainless steel splashback installation cost in the UK?
Installation costs depend on the work involved, not just the splashback’s area. A straightforward panel on a prepared wall requires less fitting work than one needing precise positioning around sockets, uneven surfaces or adjoining units. The main considerations are preparation, access, panel dimensions and the details the installer must accommodate.
Wall preparation affects the work before fitting begins. A sound, clean surface is different from one that needs existing covering removed or remedial preparation. For example, a panel fitted over existing tiles may need different alignment from one installed on a newly prepared wall. Establishing the preparation required makes installation estimates easier to compare.
Panel shape and openings also influence fitting time. A plain rectangle can be positioned as one continuous piece, while socket openings require careful alignment with the wall fittings. A cooker panel that must sit between cabinets presents another practical constraint. The panel needs to align accurately with the worktop and surrounding edges.
Access matters too. A clear wall area makes handling and positioning easier than a crowded worktop with appliances or fittings in the way. Panel dimensions affect how it can be manoeuvred into position. With several panels, each joint and meeting edge adds another alignment point.
When reviewing an installation estimate, separate fitting labour from the panel price. Confirm whether the scope includes wall preparation, removing an existing splashback, positioning around openings, sealing edges and clearing away old material. These items change the work required, so an estimate that lists them individually is more useful than a single combined figure.
Adhesive fitting requires the panel to remain supported while the adhesive cures or dries. Mechanical fixings involve planning their positions and aligning the panel before attachment. The method affects the sequence of work and the visible finish. For either method, installation requires careful placement, secure support and attention to the junctions around worktops and cabinets.
To understand the likely fitting scope, prepare the panel dimensions, mark sockets and other openings, and describe the wall surface. Note whether an existing covering needs removal and whether the panel meets cabinets or other splashback sections. These details show where installation work is concentrated and help clarify the estimate.
For a project involving a made-to-measure panel, review the stainless steel splashback options alongside the wall dimensions and cut-outs. A clear specification helps connect the panel choice with the installation work it requires.
GEC Anderson Limited: Stainless Steel Splashbacks
GEC Anderson Limited supplies stainless steel splashbacks for kitchen and washroom projects, with products available as standard, modular or made-to-measure designs. This is a natural option when a standard panel does not suit the wall dimensions, or when you’re coordinating the splashback with other stainless steel surfaces.
For a cohesive scheme, consider the splashback alongside stainless steel worktops, sinks, cabinets and doors. GEC Anderson supplies these products in standard, modular and made-to-measure options, helping you plan connected surfaces around your project’s dimensions and intended use.
Contact GEC Anderson Limited to discuss your splashback requirements and project dimensions.
Plan the next step with a clear specification
Before moving from price research to a purchase decision, bring the material choice and the room’s requirements together. A useful project brief records the panel dimensions, finish, openings and edge treatment, alongside any wall preparation and fitting work. This gives you a practical basis for discussing the stainless steel splashback cost in the UK without treating a square-metre rate as the whole project budget.
Consider the splashback as part of the wider kitchen scheme. GEC Anderson also supplies stainless steel worktops, sinks, cabinets and doors, which can help when planning connected surfaces. The right specification depends on your space and how you intend to use it.
For a considered next step, contact GEC Anderson Limited to discuss your project requirements. A clear brief can help you move forward with confidence and make an informed choice for your space.
Frequently Asked Questions
How much does a stainless steel splashback cost in the UK?
The stainless steel splashback cost in the UK depends on the panel specification and project scope. A square-metre figure will not necessarily represent the full cost for a particular kitchen. For a useful quotation, define the panel dimensions, construction and edge treatment, then account for fitting separately. A small panel with several openings requires a different specification from a plain sheet covering a larger area.
What is the average UK price per square metre for stainless steel splashbacks?
There is no single reliable average for every stainless steel splashback, because panels can differ in construction, finish and dimensions. Compare prices only for matching specifications. For example, check that both prices relate to the same type of panel, edge treatment and dimensions, and that delivery and installation are treated consistently. This gives a more meaningful comparison than averaging unlike products.
How much do made-to-measure stainless steel splashbacks cost?
The price of a made-to-measure panel is shaped by its dimensions and fabrication requirements. To obtain a project-specific quotation, prepare a drawing showing the overall shape, measurements, socket positions and any visible edge requirements. Include the intended finish and thickness. A panel with several openings or unusual edges involves a different specification from a simple rectangle, so describe those details clearly from the outset.
What thickness and grade of stainless steel are best for a kitchen splashback?
For many domestic kitchens, a standard option is 0.9 mm grade 430 stainless steel. The most suitable specification depends on the setting and the panel’s construction, rather than thickness alone. If you’re comparing products, make sure the description states both the steel grade and sheet thickness. Grade 430 is magnetic, which can also help distinguish it from other stainless steel options.